Items, customers and suppliers
The three lists everything else in your ERP is built on — and how to set them up so you are not repairing them a year from now.
The three lists you build once
Three kinds of record are entered once and then reused in every document for years: the things you sell or buy, the people you sell to, and the people you buy from. Getting them right first is what makes everything afterwards quick.
| Record | What it is | Where it is used |
|---|---|---|
| Item | Anything you sell or buy — a product, a raw material, or a service | Every quotation, order, invoice and stock movement |
| Customer | A company or person you sell to | Quotations, sales orders, delivery notes, sales invoices, and the report of who owes you money |
| Supplier | A company or person you buy from | Purchase orders, records of goods received, purchase invoices, and the report of what you owe |
When you type a customer's name onto an invoice, you are not typing text — you are pointing at that customer's record. If the record is a duplicate, sits in the wrong group, or carries the wrong tax number, every document that points at it inherits the problem, and your reports quietly give you the wrong answer.
Creating an item
An item is anything that can appear as a line on a document: a steel plate, an hour of consulting, a spare part, a delivery charge. Without items you cannot write a quotation or an invoice, so this is usually the first list you build.
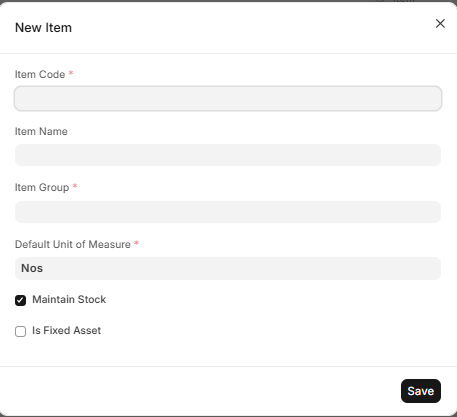
- In your ERP, press
Ctrl+G, type Item and choose Item List. Look for the thing you are about to create — if it is already there, stop and use the existing one. - Click Add Item (or New). A blank item form opens.
- Enter the Item Name — the name your staff will actually search for. Make it specific enough to tell two similar things apart.
- Choose an Item Group. This is the folder your item lives in; see below.
- Set the Unit of Measure — how you count this item: piece, kg, ton, metre, hour. Read the warning after these steps before you decide.
- Decide whether to tick Maintain Stock. Tick it for physical goods you count in a warehouse. Leave it unticked for services and charges you never hold in a warehouse, otherwise your ERP will keep waiting for stock movements that never happen.
- Enter a default selling price, and a buying price if you buy the item too, so the price fills in by itself on documents. You can still change it on any single line.
- If you already hold some of this item, fill in the Opening Stock — how many you have right now — and the Valuation Rate, which is what one unit cost you. Your first stock report is then true from day one.
- Click Save. The item now appears in the list and can be used on documents.
Item groups
An Item Group is a folder for your catalogue: Raw Materials, Finished Goods, Services, Consumables. Groups are what make reports readable — total sales by group tells you something useful, while a flat list of four hundred items tells you nothing.
Keep the structure shallow. Five to ten groups that match how you already talk about
your business are far more useful than a deep tree nobody maintains. To add one, press
Ctrl+G, type Item Group, open it and create a new group.
Creating a customer
A customer record is more than a name. It carries the commercial terms you agreed, so every future document applies them without anyone having to remember.
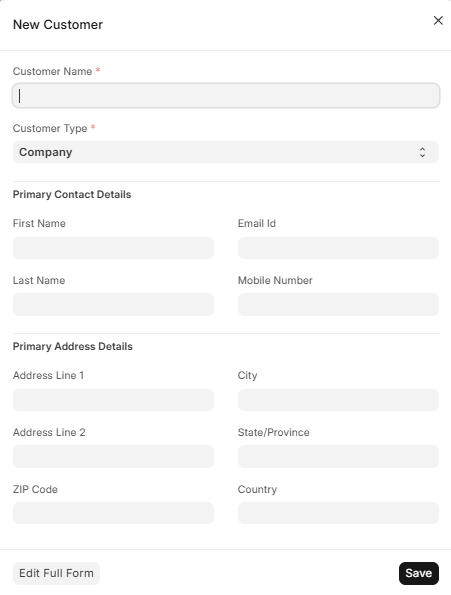
- Press
Ctrl+G, type Customer and open the Customer List. Search for the name first — see the warning below. - Click Add Customer (or New). A blank customer form opens.
- Enter the Customer Name — the legal name that should appear on invoices.
- Choose a Customer Group (for example Wholesale, Retail, Government) and a Territory, meaning the region they belong to. Both exist so you can compare performance later.
- Set a Credit Limit if you want your ERP to warn you — or block a new order — once this customer owes you more than you are comfortable with.
- Set the Payment Terms: how long they have to pay, such as cash, 30 days or 60 days. Every invoice then works out its own due date, and the report of overdue money becomes trustworthy.
- Enter the Tax ID and any registration number required where you operate. It prints on the invoice.
- Click Save. Two links then appear on the record for Contacts — the people you deal with, with phone and email — and Addresses, where the billing and delivery address can differ.
Creating a supplier
A supplier record does for buying exactly what a customer record does for selling: it holds the terms so your ERP can tell you what you owe and when.
- Press
Ctrl+G, type Supplier and open the Supplier List. Search for the name first, for the same reason as with customers. - Click Add Supplier (or New).
- Enter the Supplier Name and choose a Supplier Group.
- Set the Payment Terms you have with them, and enter their Tax ID.
- Click Save, then add their Contacts and Addresses.
Supplier payment terms are what let your ERP list what you owe and how soon it is due, which is how you avoid both late-payment friction and paying earlier than you needed to.
How the three feed everything else
Once these records exist you rarely type details again, which is the return on the care you took:
- A quotation pulls in the customer, their currency and their agreed prices, then the description and price of each item.
- A sales invoice pulls the payment terms to work out its due date, and the tax number for the printed copy.
- A delivery note pulls the item's unit of measure and reduces stock in that unit.
- A purchase order pulls the supplier and their terms.
- Every report groups by item group, customer group and territory — the fields you filled in once.
Importing many records at once
If you already have hundreds of items or customers in a spreadsheet, do not retype them one by one. The Data Import tool loads the whole file in one go.
- Press
Ctrl+G, type Data Import and choose New. - Set the Document Type to what you are importing: Item, Customer or Supplier.
- Choose Insert New Records, then click Download Template. A spreadsheet arrives with the correct column headings already in place.
- Fill the template with your data. Keep the heading row exactly as it is, and make sure any value that has to match an existing list — item group, unit of measure, customer group — is spelled exactly as it is in your ERP.
- Upload the filled file and click Start Import. The page shows progress as it runs.
- Read the result. Successful rows are created immediately; failed rows are listed with the reason, so you can correct those rows and import only them again.
If an import keeps failing and the reason is not clear, send us the file at support@nezmaro.com together with your ERP address, and we will look at it with you.